As an Amazon Associate, we earn from qualifying purchases. Some links on this site are affiliate links at no extra cost to you. Our recommendations are based on thorough research and editorial judgment.

Building a Lightweight Creator Rig: Components and Why They Matter
Building a lightweight creator rig is essential for enhancing mobility and comfort during extended filming sessions. We should prioritize components like a sturdy camera cage for stability, 15mm rail systems for attaching accessories, and ergonomic shoulder rigs to evenly distribute weight. Choosing between aluminum and carbon fiber impacts stability and weight; aluminum offers strength without flexing, while carbon fiber excels in reducing vibrations. Proper stabilization techniques and cable management are vital for maintaining image quality. Explore further to discover complementary accessories and efficient assembly tips.
Key Takeaways
- A lightweight creator rig under 3kg enhances mobility and comfort, reducing shooter fatigue during extended filming sessions.
- A stable camera cage decreases vibrations, ensuring better image clarity, especially with high-magnification lenses.
- Modular designs with 15mm rail systems allow for quick accessory attachments, increasing shooting versatility.
- Effective cable management prevents tangling, optimizing rig stability and improving workflow efficiency on set.
- Ergonomic grips and dual-handle setups distribute weight evenly, enhancing comfort and reducing fatigue during long shoots.
Understanding the Value of a Lightweight Creator Rig

Hey! You know, when we talk about content creation, one thing that really stands out is how a lightweight creator rig can make a huge difference. Imagine carrying around a camera setup that weighs less than 3kg; it really helps with mobility and shooting comfort. You can film for hours without getting worn out, especially since holding a heavy rig at arm’s length can get pretty tiring.
Using materials like aluminum alloy for things like quick-release plates gives you the stability you’ll need without the extra weight. For instance, if you’re moving around a lot, that little extra flexibility can be a lifesaver. Plus, there are modular designs out there, like shoulder mounts, that let you shift between handheld filming and tripod setups in just moments. It’s super convenient when you’re in the middle of a shoot and need to adapt quickly.
And don’t underestimate effective cable management—it keeps your equipment connected and stable, which is crucial when you’re filming in dynamic environments. By keeping everything tidy, you ensure a smooth workflow, which is key for getting the best shots. So, whether you’re out in the field or in a studio, having that lightweight rig makes the whole process feel less strenuous and way more enjoyable. Ready to explore the gear that can enhance your creative journey further? Considering camcorders with lightweight designs under 5 pounds can greatly complement your rig’s portability.
Identify Key Components for Portable, Functional Rig Design

Building a portable and functional creator rig is all about picking the right components that make your filming experience smooth and adaptable. Think of the camera cage as the sturdy spine of your rig—it holds everything together and helps cut down on those annoying vibrations while you shoot. For instance, if you’re adding things like an external monitor or a follow-focus system, a 15mm rail system is super handy because it makes attaching those accessories a breeze.
Now, let’s talk about comfort for those long filming sessions. Adding a shoulder rig can be a lifesaver! It helps spread the weight of your gear across your body, so your arms don’t end up feeling like jelly halfway through the day. Also, don’t overlook cable management; using cable clamps can really keep your setup neat. It prevents any unnecessary tugging on quick-release plates, which helps keep everything stable.
Choosing a camera cage that offers ergonomic grips and mounting options ensures both comfort and versatility in your rig.
Putting together these components not only makes your rig adaptable for all sorts of shoots but also helps you stay efficient in your creative process. Speaking of efficiency, have you thought about the type of lenses that might work best with your setup?
Choosing Between Aluminum and Carbon Fiber for Your Rig?
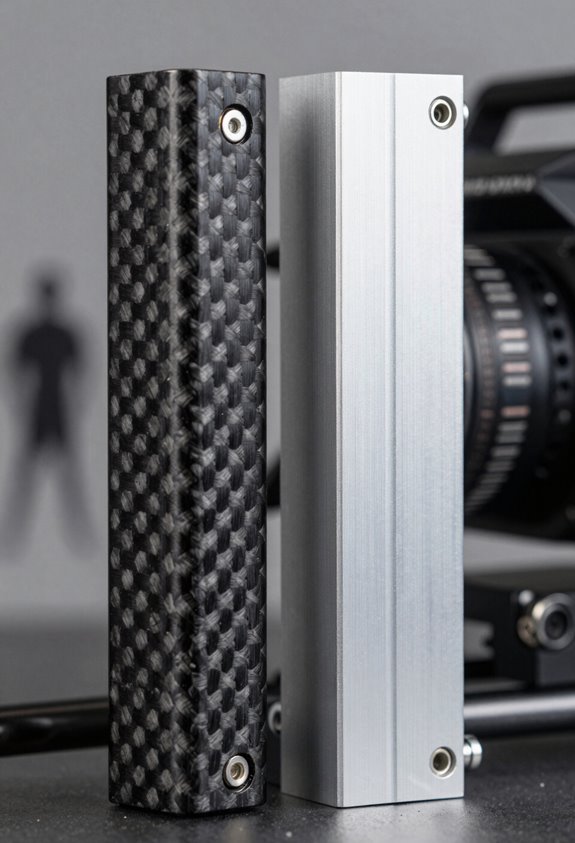
When you’re putting together your creator rig, one of the most important choices you’ll make is picking the right materials—aluminum or carbon fiber. Both have their perks, but it’s all about what fits your needs best.
Aluminum, especially alloys like 6061 and 7075, is renowned for its strength and stability. This makes it a solid choice for parts that need a precise cut, like quick-release plates. Plus, if you’re working with high-magnification lenses, aluminum helps reduce flexing, which can blur your images. Picture this: you’re out in the field capturing the perfect shot, and you want your rig to stay steady and reliable.
On the flip side, carbon fiber is incredibly lightweight and great at absorbing vibrations. This means your tripod legs can stay steady even in windy conditions, which is vital for getting clean, sharp photos. If you’ve ever shot in a busy environment where every little shake affects your frame, you’ll appreciate the stability carbon fiber offers.
While aluminum shines in extreme cold, ensuring your equipment remains stable, carbon fiber may perform better in warmer temperatures by keeping the overall weight down. In the end, it’s all about prioritizing—for some, the reliability of aluminum in tough conditions is worth it, while others might value the lightness and stability of carbon fiber. Whatever your choice, understanding these differences will definitely help you craft a rig that works best for you! So, once you’ve settled on materials, the next step is to think about how they’ll fit into your design and workflow. Additionally, integrating lightweight gimbals like the DJI RS 3 Mini can further enhance the portability and stability of your rig without compromising performance.
Stabilizing Techniques for Capturing Smooth Imagery
Hey there! If you want to capture smooth imagery, whether it’s for videos or photography, there are some neat techniques that can really elevate your work. For example, try using a dual-handle setup for your camera rig. This distributes the weight evenly, making it much easier on your arms and keeping the camera steady, especially during those long shoots.
Another handy tip is to go for a modular design. Look for rigs with parts that fit together tightly—like a puzzle—so you minimize those tiny shakes that can ruin a shot. Speaking of materials, you might consider carbon fiber tripods; they’re super lightweight but still sturdy enough to dampen vibrations, which means cleaner images overall.
Don’t overlook cable management, either. Keeping heavy cables organized can prevent them from dragging on your rig and causing unwanted movement during your shoot. And if you’re using quick-release plates, make sure they adhere to standards like the Arca-Swiss Dovetail system. This way, you can swap out your gear quickly without compromising stability.
For additional stabilization, consider adding a 3-axis gimbal stabilizer to your setup to help smooth out motion and deliver professional-looking footage.
Must-Have Accessories for Your Lightweight Rig
If you’re looking to boost your lightweight rig for a better shooting experience, let’s chat about some must-have accessories that really make a difference. A good matte box, like the FOTGA Swing-Away, is fantastic because it not only cuts down on glare and lens flare but also allows you to attach filters. This means you can keep your image sharp and clear, no matter the lighting situation.
Next up, consider adding a follow-focus system. Whether you choose a manual one or go for a motorized version, this tool lets you pull focus smoothly, making your shots look way more professional. For instance, if you’re shooting a short film, being able to adjust the focus seamlessly while filming can really elevate the end result.
Don’t forget about external monitors! Something like the Feelworld FW-760 is a great choice because it gives you a bigger screen to work with and handy tools like histograms and focus assist. This can be especially useful when trying to nail that perfect shot.
Lastly, think about using friction monitor arms and cable clamps. They’re super helpful for organizing all your connections, which keeps your rig looking tidy and stable while you work. With these accessories, you’re setting yourself up for success in your shoots, and it’s a great way to move to the next level in your filming journey. For enhanced daylight visibility and durability, consider investing in a SmallHD monitor to improve your on-set monitoring experience.
Efficient Assembly and Cable Management Tips
Hey there! If you’re putting together a creator rig, you’ll want to pay close attention to cable management. It can make a huge difference in how smoothly everything operates. For instance, using cable clamps is a smart move. They help secure your HDMI and power cables, which cuts down on any pull or torque that can mess with your quick-release plates.
Now, let’s talk about cable lengths. Shorter cords are your best friend here; they help reduce excess slack that can easily tangle up, especially when you’re setting your camera on a tripod. Imagine you’re in the middle of filming and your cables end up in a crumpled mess—it’s a headache no one wants! Also, consider getting adjustable clamps that can give a little strain relief and fit different sizes of cables. This way, you keep everything neat and tidy.
Don’t forget to check your connections regularly. It’s a simple step, but it can help you catch any issues before they become show-stoppers. You want to keep your production flowing without hiccups, right? With a solid cable management system in place, you set yourself up for success on the set! Remember, choosing cables with durability features will ensure reliable performance throughout your shoots. What’s next on your mind when it comes to assembling this rig?
Streamlining Your Rig for Improved Workflow Efficiency
If you want to improve workflow efficiency while building a creator rig, you really need to think about a streamlined design. It’s all about making things quick and easy to put together and take apart. For instance, using modular designs like FALCAM can help reduce those annoying micro-vibrations and let you set up your gear faster without any complicated tools.
One of the best things you can do is integrate quick-release standards, such as the Arca-Swiss Dovetail system. This allows you to swap out equipment in a flash, cutting down on downtime during shoots. Plus, when you choose lightweight materials like aluminum alloys for your quick-release plates and carbon fiber for tripod legs, you’ll not only make things easier to carry but also maintain the stability you need for high-quality video footage.
Don’t forget about cable management! Using modular cable clamps can keep your setup tidy and prevent unwanted torque, which stabilizes everything. And if you add ergonomic dual-handle setups, you’ll be more comfortable during those long shooting sessions. All these tweaks really make a difference in your overall shooting experience—let’s explore some specific gear that can elevate your setup even further.
Incorporating a Manfrotto tripod into your rig can provide the perfect balance between lightweight portability and robust stability for a variety of shooting conditions.
Frequently Asked Questions
How Much Weight Can a Lightweight Creator Rig Support?
A lightweight creator rig typically supports up to 10-15 pounds. We should consider rig weight capacity, lightweight materials, and gear stability factors, along with effective balancing techniques, to guarantee ideal performance and safety during use.
Can I Use My Existing Camera Accessories With a New Rig?
Like puzzle pieces, our existing camera accessories can fit into a new rig smoothly, but we should watch for compatibility issues. With adapter solutions and accessory upgrades, the performance impact can be minimal. Let’s explore!
What Is the Ideal Size for a Portable Creator Rig?
The ideal size for a portable creator rig features a compact design, ensuring travel-friendly features and user-friendly dimensions. We must prioritize portability considerations, allowing us to easily transport our gear wherever our creative journey takes us.
Are There Any Specific Maintenance Tips for My Creator Rig?
Sure, we’ll just ignore maintenance, right? For our rigs, let’s embrace cleaning techniques, prioritize component durability tips, optimize rig storage, and stick to a routine inspection checklist. A happy rig equals happy creators!
How Do I Choose the Right Clamps for My Rig Setup?
When choosing clamps, we should prioritize clamp material quality, consider weight capacity, and opt for adjustable designs. Multi-purpose clamps can enhance versatility, ensuring our setup remains sturdy and adaptable for various projects.


